Access Packages
What This Page Does
This page lets you set up and manage the packages your visitors can purchase on your site. You can create subscription plans for VIP site access, token bundles that users buy for tipping and unlocking content, and subscription templates for your creators. Everything related to what users can buy and how much it costs is controlled here.
How to Get Here
Navigate to Admin Panel > Settings > Billing System > Access Packages
Understanding the Page
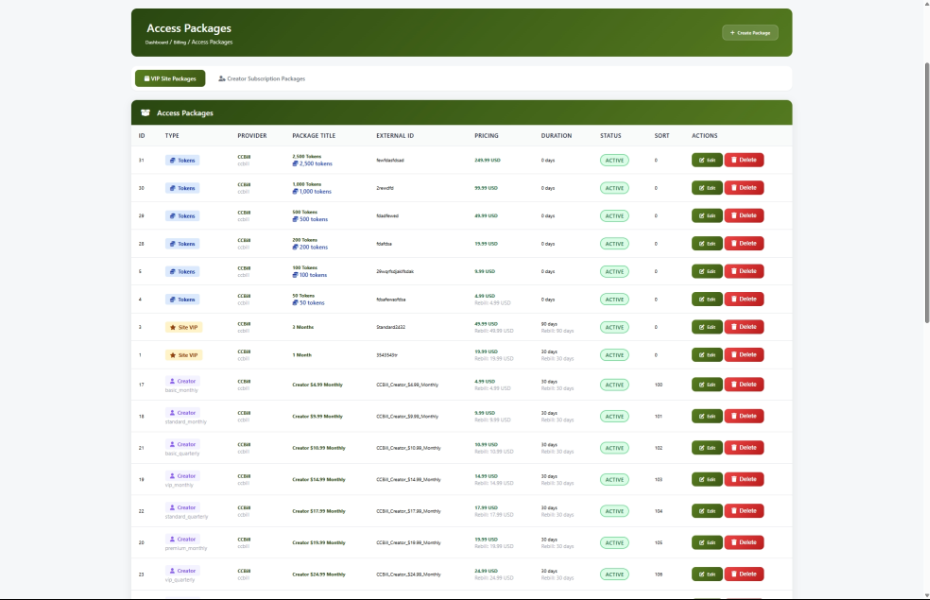
When you open this page, you will see a table listing all of your current packages. Each row shows the package name, its type, the payment provider it uses, pricing details, and whether it is currently active.
Navigation Tabs
At the top of the page you will find two tabs:
- VIP / Site Packages -- This is the current page, where you manage all access packages.
- Creator Subscription Packages -- Takes you to a separate page for managing creator-specific subscription tiers.
The Packages Table
The main area of the page shows all your packages in a table. Each package displays:

Quick Navigation Buttons
Below the table you will find buttons to quickly jump to related pages:
- Manage Providers -- Go to your payment provider settings
- View Transactions -- See all billing transactions
- View Logs -- Check payment processing logs
Understanding Package Types
There are three types of packages you can create. Each one serves a different purpose on your site.
Common Tasks
How to Create a Token Package
Use this when you want to sell tokens that users can spend on tips, pay-per-view content, or other site features.
- Click the Create Package button at the top of the page.
- Select your Payment Provider from the dropdown.
- Set Package Type to Token Package.
- Type a clear name in the Package Title field (for example, "100 Tokens").
- Enter the External ID -- this is the matching package ID from your payment provider's dashboard.
- Optionally add a Description to explain what users get (for example, "Get 100 tokens for tips and PPV content").
- Set the Initial Price to your desired amount (for example,
9.99). - Select the Currency (for example, USD).
- Set Initial Duration to
0(tokens do not expire based on a time period). - Set the Tokens field to the number of tokens included (for example,
100). - Leave Rebill Price and Rebill Duration at
0since token packages are one-time purchases. - Set a Sort Order number to control where this package appears relative to others (lower numbers appear first).
- Make sure Enable Package is checked.
- Click Create Package.

How to Create a VIP Subscription
Use this when you want to offer a recurring membership that gives users premium access to your site.
- Click the Create Package button at the top of the page.
- Select your Payment Provider from the dropdown.
- Set Package Type to Site VIP Subscription.
- Type a name in the Package Title field (for example, "VIP Monthly Access").
- Enter the External ID from your payment provider's dashboard.
- Optionally add a Description (for example, "Full access to all premium content for 30 days").
- Set the Initial Price (for example,
29.99) and select the Currency. - Set Initial Duration to the number of days for the first billing period (for example,
30for monthly). - Set the Rebill Price to the recurring amount (often the same as the initial price).
- Set the Rebill Duration to the number of days between recurring charges (for example,
30). - Set Tokens to
0(VIP subscriptions do not include tokens unless you want to add a bonus). - Set Sort Order and make sure Enable Package is checked.
- Click Create Package.
How to Create a Creator Subscription Template
Use this when you want to set up a subscription tier that creators can offer to their subscribers.
- Click the Create Package button at the top of the page.
- Select your Payment Provider from the dropdown.
- Set Package Type to Creator Subscription.
- A new Creator Tier field appears. Type a tier label such as "monthly", "quarterly", or "yearly".
- Fill in the Package Title, External ID, Pricing, and Duration fields just like a VIP subscription.
- Click Create Package.
How to Edit a Package
- Find the package you want to change in the table.
- Click the Edit button (the green button with a pencil icon).
- A form opens with all the current values already filled in.
- Make your changes.
- Click Save Changes.
How to Disable a Package (Without Deleting It)
If you want to temporarily hide a package from your users without removing it permanently:
- Find the package in the table.
- Click the Edit button.
- Uncheck the Enable Package checkbox.
- Click Save Changes.
The package disappears from your site immediately, but any users who already purchased it keep their active subscriptions until they expire.
How to Delete a Package
- Find the package you want to remove in the table.
- Click the Delete button (the red button with a trash icon).
- A confirmation message appears asking if you are sure.
- Click OK to confirm the deletion.
Settings and Options Explained
When creating or editing a package, here is what each field does:
How Packages Appear on Your Site
The packages you create here show up in different places depending on their type:
- Token packages appear on your site's token purchase page. Users see the title, description, price, and number of tokens included.
- VIP subscriptions appear on your site's membership or VIP page. Users see the title, description, price, and subscription duration.
- Creator subscriptions are used behind the scenes by the creator system. They do not appear directly on a public page but are referenced when creators set up their subscription offers.
The Sort Order you set controls which packages appear first. Disabled packages are hidden from all public pages immediately.
Tips for New Users
- Start by setting up your payment provider first. You cannot create packages without at least one active payment provider.
- Create a small number of packages to start (2-3 subscription tiers and 3-4 token bundles) and add more later based on what your users respond to.
- Always test a purchase with your payment provider's test or sandbox mode before going live.
- Use clear, descriptive names for your packages so users understand exactly what they are buying.
- Double-check the External ID by copying it directly from your payment provider's dashboard to avoid typos.
Suggested Pricing Strategy
Here are common price ranges to help you get started:
Troubleshooting
A package is not showing up on my site
What you see: You created a package but users cannot find it on the public site.
How to fix it:
- Go to Admin Panel > Billing > Access Packages and check that the package's status shows Active (green label).
- Verify the package type matches where you expect it to appear. Token packages only show on the token purchase page, and VIP packages only show on the membership page.
- For token packages, make sure the Tokens field is greater than 0.
- For VIP packages, make sure the Initial Duration is greater than 0.
- Check that your payment provider is still enabled by visiting Admin Panel > Billing > Payment Providers.
I see a "Duplicate External ID" error when creating a package
What you see: An error message appears when you try to save a new package.
How to fix it:
- This means another package already uses the same External ID with the same payment provider.
- Look through your existing packages to find the one with the matching External ID.
- Either use a different External ID for your new package, or edit the existing package instead.
The payment provider dropdown is empty
What you see: There are no options in the Payment Provider dropdown, and you cannot create a package.
How to fix it:
- Go to Admin Panel > Billing > Payment Providers.
- Enable at least one payment provider.
- Return to Access Packages and the dropdown will now show your enabled providers.
A user's payment is failing even though the package looks correct
What you see: Users report errors when trying to purchase a package that appears to be set up correctly.
How to fix it:
- Go to Admin Panel > Billing > Billing Logs and look for error messages related to the failed payment.
- Log into your payment provider's dashboard and verify that the External ID is active and correctly configured.
- Make sure the currency you selected matches what your payment provider supports.
- If you are still testing, confirm you are not accidentally using sandbox/test credentials on your live site (or vice versa).
- Check for extra spaces or typos in the External ID by comparing it character by character with your provider's dashboard.
I see a "Demo Mode" banner and cannot make changes
What you see: An orange banner at the top of the page says modifications are disabled, and all buttons are grayed out.
How to fix it:
This means your site is currently in demonstration mode. Contact your system administrator or developer to turn off demo mode so you can make changes.